Contouring is a makeup technique used to define and shape the face by creating shadows and highlights. When done correctly, it enhances your natural bone structure, making your face look more sculpted and balanced. For beginners, contouring may seem complicated, but it becomes easy once you understand where to apply product and how to blend it properly.
This guide explains how to contour your face for beginners step by step using simple techniques, easy product choices, and natural-looking methods.
What Is Contouring?
Contouring is the use of darker shades to create shadows and lighter shades to highlight certain areas of the face. This helps:
- Define cheekbones
- Slim the face visually
- Sharpen the jawline
- Enhance nose shape
- Balance facial features
The goal is not to change your face but to enhance its natural structure.
What You Need for Beginner Contouring
You don’t need many products to start contouring.
Basic essentials:
- Cream or powder contour (2 shades darker than skin tone)
- Concealer or highlighter (1–2 shades lighter)
- Blending sponge or brush
- Foundation (optional but helpful)
- Setting powder
Cream products are often easier for beginners because they blend naturally into the skin.
Step-by-Step Guide to Contour Your Face
Step 1: Apply Foundation (Optional Base Step)
Start with a smooth base using foundation if you prefer full makeup coverage.
Benefits:
- Creates even skin tone
- Helps contour blend better
- Improves makeup longevity
If you prefer natural makeup, you can skip foundation and use contour lightly.
Step 2: Identify Your Face Shape
Understanding your face shape helps you place contour correctly.
Common face shapes:
- Round
- Oval
- Square
- Heart-shaped
- Long/oblong
Each shape has slightly different contour placement, but beginners can follow a universal method.
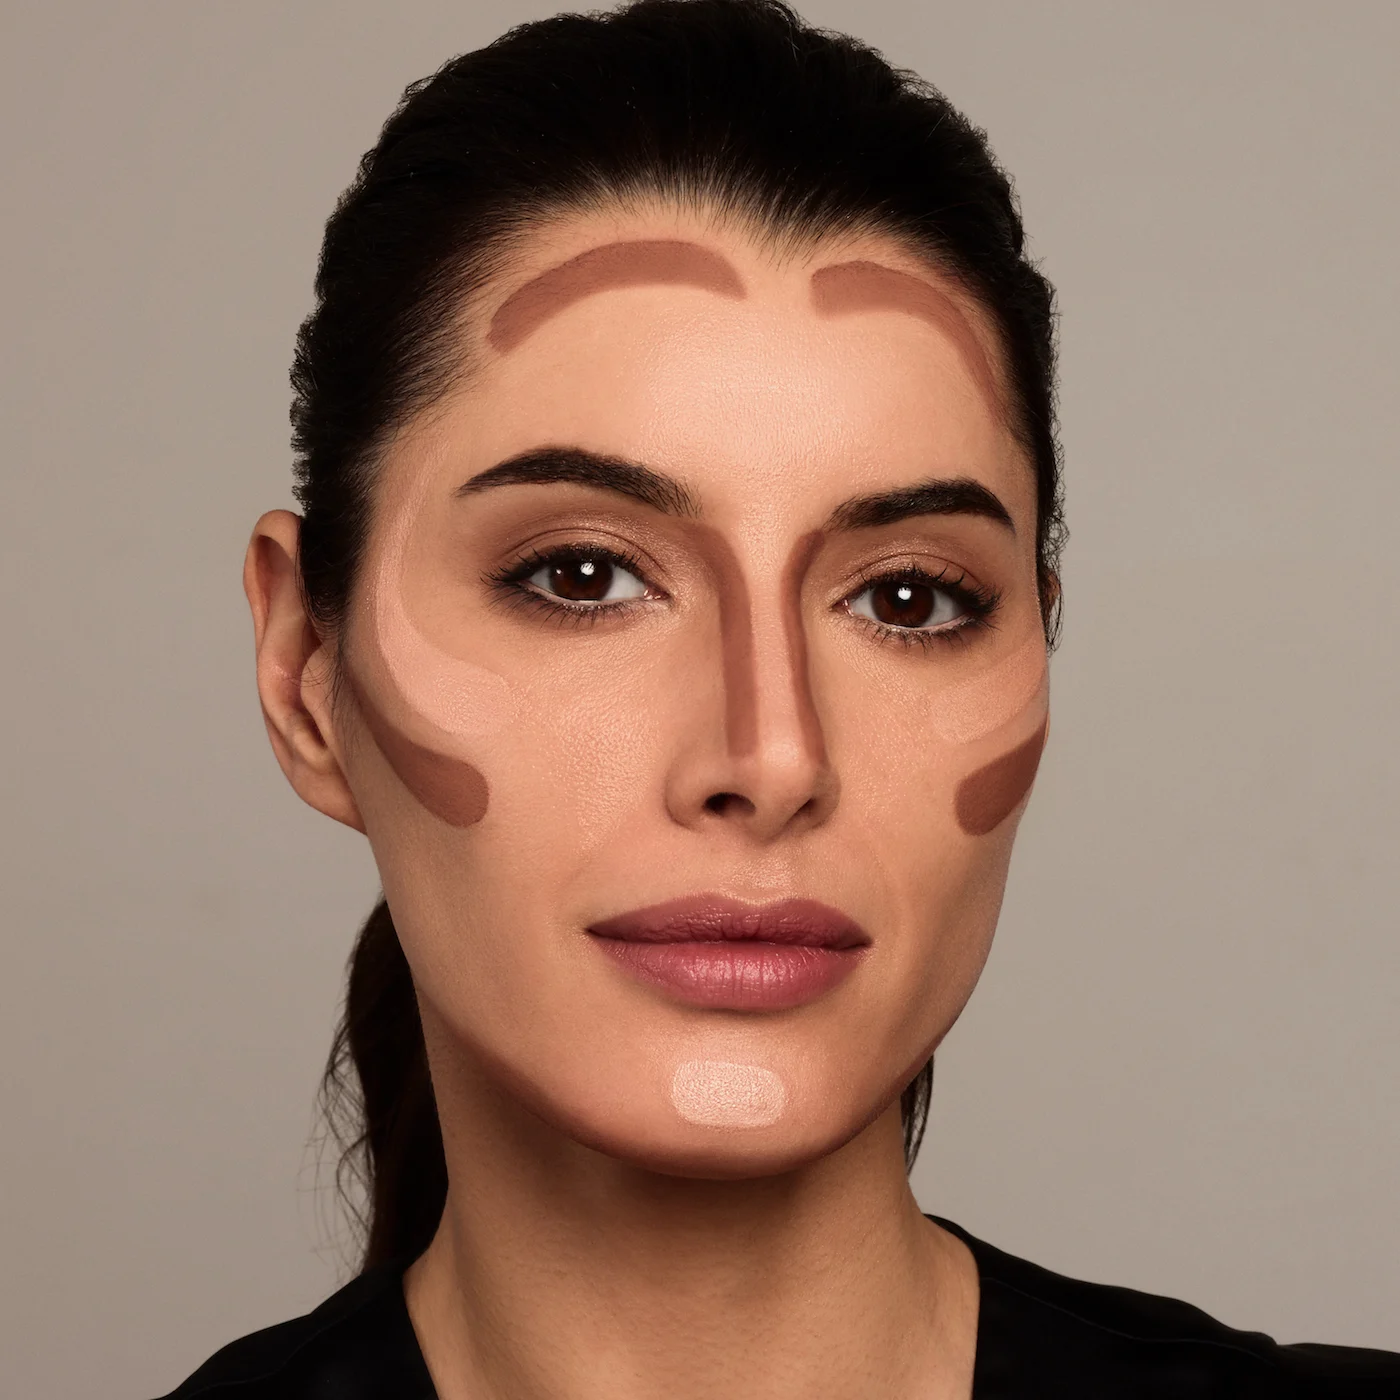
Step 3: Contour the Cheekbones
This is the most important contour step.
How to do it:
- Suck in your cheeks slightly
- Apply contour below cheekbones
- Start from ear and move toward mid-cheek
- Keep the line soft, not harsh
This creates a lifted and sculpted effect.
Step 4: Contour the Jawline
Jawline contour helps define the lower face.
How to do it:
- Apply contour along jawline
- Blend downward into neck
- Focus under chin if needed
This helps create a sharper facial outline.
Step 5: Contour the Forehead
Forehead contour balances facial proportions.
How to do it:
- Apply contour along hairline
- Blend upward into hairline
- Focus on sides of forehead if it is wide
This helps visually reduce forehead width.
Step 6: Contour the Nose (Optional)
Nose contour is optional for beginners but very effective.
How to do it:
- Draw two thin lines along sides of nose
- Blend gently without spreading too much
- Add light highlight down the center
This creates a slimmer nose appearance.
Step 7: Highlight High Points of Face
Highlighting brings light to the face and balances contour shadows.
Apply highlighter on:
- Bridge of nose
- Cheekbones
- Center of forehead
- Chin
- Inner corners of eyes
This gives a healthy glow and dimension.
Step 8: Blend Everything Properly
Blending is the most important step in contouring.
Tips:
- Use a damp sponge for natural finish
- Blend in circular or tapping motions
- Avoid sharp lines
- Make sure contour and highlight merge smoothly
Poor blending is the most common beginner mistake.
Simple Contour Map Table
| Face Area | Contour | Highlight |
|---|---|---|
| Cheeks | Under cheekbones | Top of cheekbones |
| Nose | Sides of nose | Bridge of nose |
| Forehead | Hairline | Center forehead |
| Jawline | Under jaw | Chin center |
Beginner-Friendly Contouring Tips
1. Start Light
Use small amounts of product and build gradually.
2. Choose the Right Shade
Contour should be only 1–2 shades darker than your skin tone.
3. Blend More Than You Think
Well-blended makeup looks natural and professional.
4. Use Cream Products First
Cream contour is easier to control for beginners.
5. Practice in Natural Light
This helps you see how contour looks in real life.
Common Mistakes Beginners Make
Using Too Dark Contour
This creates harsh, unnatural lines.
Not Blending Properly
Unblended contour looks patchy and obvious.
Applying Too Much Product
Less product gives a more natural finish.
Ignoring Face Shape
Wrong placement can distort facial balance.
Skipping Highlighting
Highlighting is essential for dimension.
Simple Everyday Contour Look
For beginners, a natural look is best:
- Light cheekbone contour
- Soft jawline definition
- Minimal nose contour
- Subtle highlight
This enhances features without looking heavy.
When to Use Contouring
Contouring is ideal for:
- Daily makeup (light version)
- Events and parties (more defined)
- Photography and videos
- Special occasions
You can adjust intensity based on the occasion.
Conclusion
Learning how to contour your face for beginners step by step is about understanding placement, using the right shades, and blending properly. You don’t need advanced skills or expensive products to achieve a naturally sculpted look.
By starting with light application, focusing on cheekbones, jawline, and forehead, and blending carefully, beginners can easily create a balanced and enhanced facial appearance. With practice, contouring becomes a simple and powerful part of your makeup routine.
Frequently Asked Questions (FAQs)
What is the easiest way to contour for beginners?
Start with light cream contour on cheekbones and jawline, then blend well for a natural look.
Do I need contour and highlight together?
Yes, both work together to create balance and dimension on the face.
Should beginners use cream or powder contour?
Cream contour is usually easier for beginners because it blends more naturally.
Where should I apply contour on my face?
Cheekbones, jawline, forehead, and optionally nose are the main areas.
How do I avoid harsh contour lines?
Use small amounts of product and blend thoroughly using a sponge or brush.
Can I contour without foundation?
Yes, you can lightly contour on bare skin for a natural everyday look.